
Creating and managing roles in programs
What is a role?
Think of roles as a way to group your volunteers within a program. For example, think of the roles needed for a community kitchen:
- Coordinator
- Cook
- Server
- Cleaner
Currently, each volunteer is allocated only one role.
Does a volunteer need to have a role?
No, you can decide to keep all volunteers in one group. This is a good option if your volunteers perform multiple roles. For example, they are a cleaner one week and a server the next.
Grouping your volunteers by assigning roles will make scheduling easier, as you can find volunteers quickly and spot gaps. It will also assist you if you send open shifts to volunteers. Read more about understanding roles.
Creating a role
This can be accomplished in several different ways—either one at a time, as volunteers are assigned, or all at once.
Create a new role when assigning a volunteer

- From a program's volunteer list, select the volunteer who requires a role
- Select the role dropdown. If the volunteer is not yet assigned, it will say 'unassigned'
- Type the role into the search bar
- The dropdown will show an option to create role... select this
⭐ Done! Now this role will appear in the dropdown as an option ⭐
Create multiple roles at once

- Select the program menu icon (the down-facing chevron) located at the end of the program name in the header
- Select Manage program roles from the context menu that appears
- When the Manage program roles modal appears, select the link 'add item...'
- Type in the new role and select save
- Repeat selecting 'add item...' and typing in the role
- When finished, select the 'Done' button
⭐ Done! Now these roles will appear as options when assigning volunteers ⭐
Editing or deleting a role

- Select the program menu icon (the down-facing chevron) located at the end of the program name in the header
- Select Manage program roles from the context menu that appears
- When the Manage Program Roles modal appears, select the context menu icon at the end of the role you want to edit or delete (represented by three dots)
- When finished, select the 'Done' button
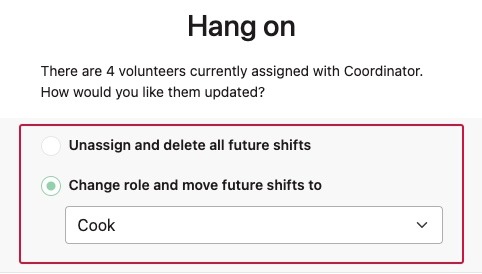
Note: If you attempt to delete a role to which a volunteer is assigned, a modal will appear asking whether you would like to unassign or reassign them.
Changing the order of the roles on the schedule
- Select the program menu icon (the down-facing chevron) located at the end of the program name in the header
- Select Manage program roles from the context menu that appears
- The order in which the roles appear in the modal matches the schedule. Select a role box (anywhere but the three dots) and drag and drop to a new position
- When finished, select the 'Done' button